
Saturday, December 30, 2017
Happy New Year
2017 came and went so quickly. So much has been done on the railway, I'm pretty happy with how it has developed. In 2018 we should start to see just how the scenic side of things will look, which is my favorite part of building a model railway. Perhaps, a first locomotive project will get under way, and I must do something for coaching stock, the passengers are complaining about riding in open wagons !

Saturday, December 16, 2017
Happy Holidays
Just a bit of fun :) quickly filmed video featuring a " special " delivery to Windrush Junction. Work on the railway for 2017 is just about finished for the year. A lot has been accomplished considering the limited time I've had to work on it. All track / electrical work complete, control panels finished, extension to fiddle / storage sidings in closet finished (* topic of future post), track painted, platforms built, main station building, loco shed, and water tower all built and mostly finished say a little weathering / detailing. Fortunately a lot more modelling to look forward to in 2018, so much to do ;)
From the staff of the B.B.R. ~
We Wish Everyone a Happy Holiday Season, and a Super Healthy Fun Productive 2018 ! Cheers, Felix
From the staff of the B.B.R. ~
We Wish Everyone a Happy Holiday Season, and a Super Healthy Fun Productive 2018 ! Cheers, Felix
Monday, December 4, 2017
Windrush Junction
Latest development is the completion (is anything ever completely finished on a layout ?) of the station building for "Windrush Junction".
What's in a name ? With the dock / seaside village of "Boxer Bay" I needed a name for my other station. A splendid suggestion from my Dad who came up with it. For those classic English Comedy film fans, you might be able to figure out where the name came from !
 The Station is a nice kit from Skytrex, formally NMB models. Resin with white metal details. It went together with minimal work, and the size fits in nicely with the space available and theme of my Col. Stephens railway. Now time to start adding some details, and get painting some proper figures ! I'm working on some history (fictional of course) notes for the B.B.R., complete with maps and slightly updated / revised track plan. Cheers
What's in a name ? With the dock / seaside village of "Boxer Bay" I needed a name for my other station. A splendid suggestion from my Dad who came up with it. For those classic English Comedy film fans, you might be able to figure out where the name came from !

Monday, October 30, 2017
Stone Bridge
More progress on the creek and stone bridge this week. The plaster bridge casting was painted and weathered with acrylic paints and chalk powders. Later I added a bit of vegetation growth on the side with Woodland Scenics flock and some Elmers glue. The creek now has a base. I'm pretty happy with the overall shape and look. Next phase will be painting and then the tricky bit of adding the water, which I've never done before !


Sunday, October 22, 2017
Adding the creek
Operating my railway the other day, I decided it was time to make it less flat, and discovered I had a nice plaster casting of a stone bridge that just happened to be the right size for a small bridge, so out came the saws, carving knives and after an afternoon of some fun, this is the result. I do plan on having a couple hills and tunnels, but I thought this was a nice variation on the terrain, lower then track level. Next up is painting & weathering the bridge, as well as maybe a detail or 2, and installation. Then the creek itself is up next. This is what I really enjoy about building a layout, scenery, so much fun !


Monday, September 18, 2017
Col. ~ The Water's Arrived !
"Col. The water tower is finished !" There was much rejoicing in Boxer Bay, another important structure is now complete (at least for now). A very nice resin kit by Skytrex (originally by NMB models I believe). It looks very impressive and definitely demonstrates the awesome size of O scale structures. I'm happy that I didn't try to jam in more track then I'd originally wanted to ! With the position of the loco shed and tower, it frames the view of passing trains through the station nicely.
Who am I kidding, building these structures is just delaying the unavoidable track ballasting, guess I'd better start soon, maybe tomorrow, or next week, it'll kill a few cold dark Winter hours I'm sure.
Cheers !


 Love this vantage point !

Who am I kidding, building these structures is just delaying the unavoidable track ballasting, guess I'd better start soon, maybe tomorrow, or next week, it'll kill a few cold dark Winter hours I'm sure.
Cheers !


Thursday, August 31, 2017
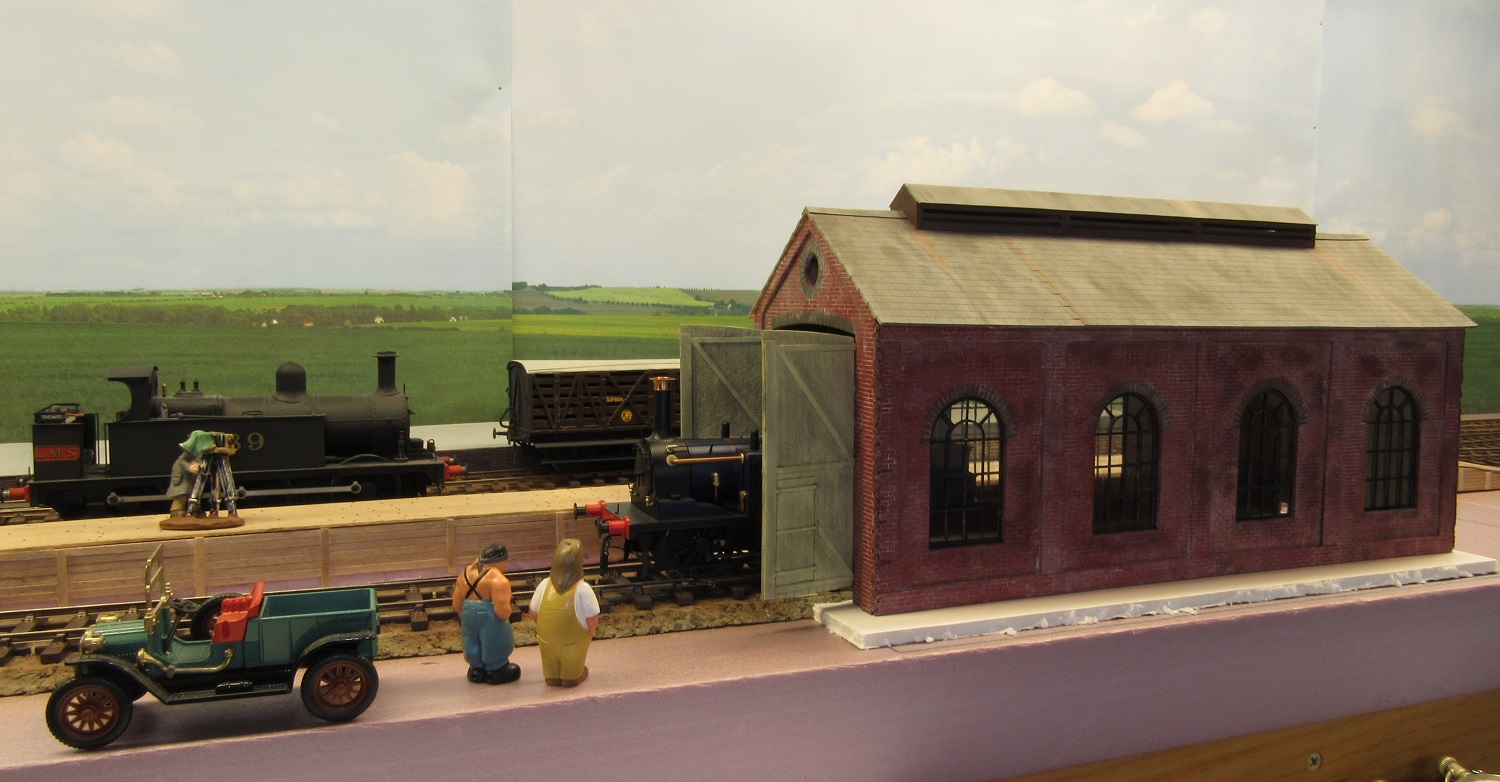
Beautiful Shed !
With Summer almost over, and not many updates posted, thought it was time for a report on the projects the B.B.R. has been working on.
I really wanted to do a little work on making the layout look like a railway, instead of the "Pink Foam Railway". Before I ballast the track though, I decided it was a good idea to build and install my platforms in the station area, that way the ballast won't get in the way when it came time to install them. They are by no means finished, with details like lamps, bench seats, and weathering to do, but the basic platforms are in. More on those later.
I thought it had been long enough without a major structure on the layout too, so I got to work on a pretty nice laser cut kit by LCUT, fairly inexpensive at £36.99. Their Small Loco Shed seemed just right for my Col. Stephens line, and a good fit for my small station at Boxer Bay Jct. Overall I was very happy with the kit, everything fit pretty good, and was easy to build with simple wood glue. Instructions could have been better - what else is new ! Painting and weathering was easy, with chalk powders giving the final touch.
I'm still learning and think my weathering is getting better, but I also build within my limits, so I maintain a consistent level throughout my modelling. Here is a few photos of how the scene now looks, starting to look more like a Railway. Hope Everyone has a Great Time @ Telford Guildex :)) All for now !


Sunday, June 18, 2017
Summer Update - Trackwork
Hello everyone,
Where have I been ? It's been a little while since the last update on the BBR. Well nicer weather, busy with work, garden etc... have left limited time for the railway. However I've managed to get a couple things done lately, including painting the rails / track. This was done with a spray can, I know I took the easy way out ! But I will go back and brush paint in some effects in certain areas like the loco shed to add a bit of variety in rail colours, and I'll weather the sleepers in due course. What a difference it makes once you paint the rails, night and day !
I've also managed to install my first buffer stop, not exactly as exciting as a new loco, but in O scale even a buffer stop looks impressive, at least to me ! This one is built and modified from the Peco rail type, I used a wood beam instead of the supplied rail one, and installed a lantern taken from the original Peco beam.
The next step will be continuing with weathering the track, and then comes the fantastic, joyful task of ballasting. The Colonel is busy recruiting inmates at the local prison, and looking for volunteers to get this stage of development moving forward 😊


Saturday, April 8, 2017
First Structure - A Fun side project
I was looking for any excuse to delay painting the rails and ballasting the track, and I found it ! A very inexpensive and fun side project, a weight bridge structure kit from Lcut. Kit # B 70-14, cost is only £10, or $12 USD. The kit is laser cut and is very high quality, everything fit together perfectly and the whole thing was built, painted and weathered in about 2 hours. I chose to prime it with Humbrol acrylic, then brush paint it with Tamiya acrylics and used chalk powders for weathering. The model takes up about 114 x 132mm, including the base. Photos show a little gap between building and base, that will disappear when building is glued to the base. I hope to improve my painting skills in this area but I think it turned out pretty good. Now sadly onto the ballasting :(


Saturday, April 1, 2017
Running a few Trains ~ Finally !
Finally, had a little spare time to run some trains ! Needed to test out all the wiring to make sure they're no problems with the control panels or anything else. It all checks out, so now onto ballasting & weathering the trackside. I hope to start a major structure very soon as well !
Thursday, March 23, 2017
A Recent Acquisition
The Col. was able to acquire a "new" piece of equipment for the B.B.R., an Ex Midland Railway 1F 1377 class 0-6-0T. Our locomotive Superintendent had a quick look over and gave the thumbs up, despite some history of the loco wanting to only run in reverse ! Here She is being lined up for the official photograph, awaiting re-lettering & numbering.


Tuesday, March 21, 2017
A special flat wagon
Evening All,
And Now for something completely different ! This model was built from a very nice laser cut wood kit by B.T.S. (Better Than Scratch). I can highly recommend their kits, always a joy to build !
It's a USMRR flatcar, built in 1860's. Kit #19517. My Dad built and weathered this model, added buffers and used Wiseman white metal archbar trucks. It fits in surprisingly well with the 7mm equipment, so will be used on the BBR from time to time for special duties.
Seen here delivering Bertie Wooster's Aston Martin :)


Tuesday, March 14, 2017
Link vs Tension Lock Couplings
Busy Busy times, leaves little time for the railway, but one important decision was made !
Prototype authentic link couplings, or a choice of auto couplers. There looks to be hundreds of choices, but after some thought and testing, I picked the Bachmann OO tension lock type. I was tempted to stick it out with the 3 link chains, but I know my eyesight will only get worse, and there will be a couple spots on my railway which will be hard to reach. With the convenience of auto coupling, and with a tool, easy uncoupling, the decision was easy. I don't think they look too bad, and when the wagons are coupled, I can barely notice them. Buffer locking is no longer an issue ! I tested them on 3 wagons and they worked great on curves down to 42" radius. Kadee knuckle couplers were tempting, but they're just too noticeable and looked odd on English equipment, at least to me. Installation is easy with little work, and I can leave the original hooks, which allows the wagons to be coupled to another wagon which is not yet equipped with TLs, another bonus !


Prototype authentic link couplings, or a choice of auto couplers. There looks to be hundreds of choices, but after some thought and testing, I picked the Bachmann OO tension lock type. I was tempted to stick it out with the 3 link chains, but I know my eyesight will only get worse, and there will be a couple spots on my railway which will be hard to reach. With the convenience of auto coupling, and with a tool, easy uncoupling, the decision was easy. I don't think they look too bad, and when the wagons are coupled, I can barely notice them. Buffer locking is no longer an issue ! I tested them on 3 wagons and they worked great on curves down to 42" radius. Kadee knuckle couplers were tempting, but they're just too noticeable and looked odd on English equipment, at least to me. Installation is easy with little work, and I can leave the original hooks, which allows the wagons to be coupled to another wagon which is not yet equipped with TLs, another bonus !


Wednesday, March 1, 2017
A little Research & Inspiration !
Now arriving on platform 4, reading material for the next decade ! 36 back issues of Railway Bylines, in my opinion the best magazine covering the history of Britain's railways and industry, landed on my doorstep this afternoon. I highly recommend this publication to anyone interested in modeling the steam age, you won't be disappointed !


Wednesday, February 8, 2017
Coal Load for a Wagon
Evening All,
Time has been limited for rolling stock construction, with most of the time being reserved for getting the railway up and running. I did manage to convert another vintage 70's built wood wagon I inherited from Arthur, and this time I made a proper load for it. For Christmas I received some actual lumps of coal ! My Brother thought it'd be a cruel joke, having a difference of opinion regarding politics, but I had the last laugh :) It turned out to be the best gift he has ever given me, now I'm stocked up on coal and able to fill my wagons with what I believe to be a very convincing load. Simple to make, cut a foam poster board to roughly the shape of the inside of the wagon, push it in about 1/2", paint it black, smash some coal into appropriate sizes, apply PVA glue and you're Set ! A photo below shows one of his unfinished wagons, so you get the idea of his method of construction. Now back to layout wiring :(


Time has been limited for rolling stock construction, with most of the time being reserved for getting the railway up and running. I did manage to convert another vintage 70's built wood wagon I inherited from Arthur, and this time I made a proper load for it. For Christmas I received some actual lumps of coal ! My Brother thought it'd be a cruel joke, having a difference of opinion regarding politics, but I had the last laugh :) It turned out to be the best gift he has ever given me, now I'm stocked up on coal and able to fill my wagons with what I believe to be a very convincing load. Simple to make, cut a foam poster board to roughly the shape of the inside of the wagon, push it in about 1/2", paint it black, smash some coal into appropriate sizes, apply PVA glue and you're Set ! A photo below shows one of his unfinished wagons, so you get the idea of his method of construction. Now back to layout wiring :(


Sunday, January 29, 2017
Control Panels !
Hello everyone !
Been a very busy few months, haven't had much time to work on the railway, but I managed to find a little in the last few weeks to do up my control panels. Very simple, DC block control, just have the basic track diagram, and section switches with the lines colour coordinated for each block. I'm no artist so it's very basic, but easy and simple to use, which I like very much ! Made from 1/4" ply, cut to shape, with drilled holes for the toggle switches, and the track diagram drawn on white card laid on top. In time I'll add the signals into the diagram, and a timetable with operating instructions located at the bottom.


Been a very busy few months, haven't had much time to work on the railway, but I managed to find a little in the last few weeks to do up my control panels. Very simple, DC block control, just have the basic track diagram, and section switches with the lines colour coordinated for each block. I'm no artist so it's very basic, but easy and simple to use, which I like very much ! Made from 1/4" ply, cut to shape, with drilled holes for the toggle switches, and the track diagram drawn on white card laid on top. In time I'll add the signals into the diagram, and a timetable with operating instructions located at the bottom.


And this is one major reason for the lack of time, the newest employee of the BBR ! " Niki "

Tuesday, January 10, 2017
My Route To O scale
Beginning the new year, I was pondering my "model railway career" through the years that has led me to O scale. I've tried many different scales, gauges, and prototypes. However the turning point was when I purchased a vintage magazine, Model Railway News March 1960.

Inside that issue was a superb railway built by S.J. Dickson, O Gauge in a Small Space. I had attempted to build an O scale layout once before, a huge layout some 36' x 14', way to much for me and I gave up, ripped it all up and went HO. This article showed that a very nice O railway could be built in just a small space, 14' x 10' (which now happens to be the size of Boxer Bay)

There is one particular quote from the article that stuck with me and heavily influenced my decision to stick with O, "I think there is a minimum satisfying size for a model and to me that is 7mm scale." After all these years I agree 100%, you just don't get the same feeling with a model of anything in the smaller sizes, be it a car, building, or even figure. I know I'm in O scale for life.
There is no other size as Satisfying !
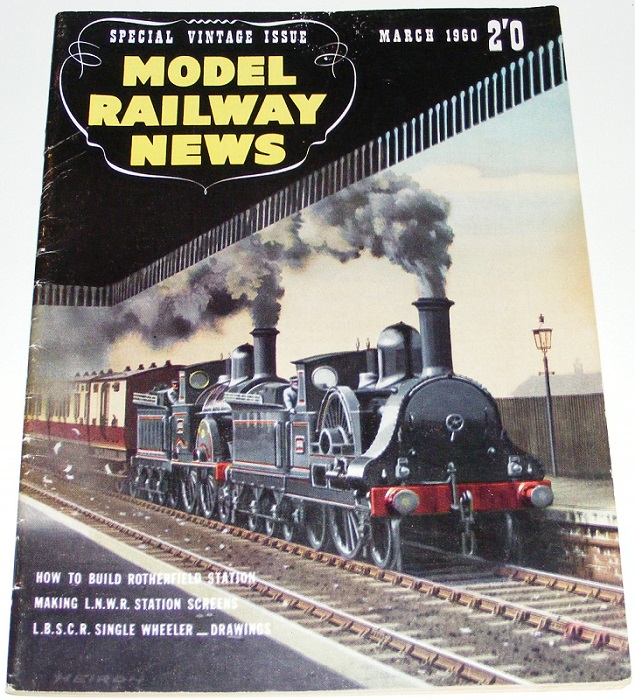

Subscribe to:
Posts (Atom)